
Microgreen Mold vs Root Hairs: 5 Clear Checks
Last updated: August 12, 2026.
Affiliate disclosure: As an Amazon Associate I earn from qualifying purchases. Links marked “paid link” may earn Fern & Shelf a commission at no extra cost to you. Read our full Affiliate Disclosure.
Start here: For a complete overview, see our How to Grow Herbs Indoors Without Sunlight.
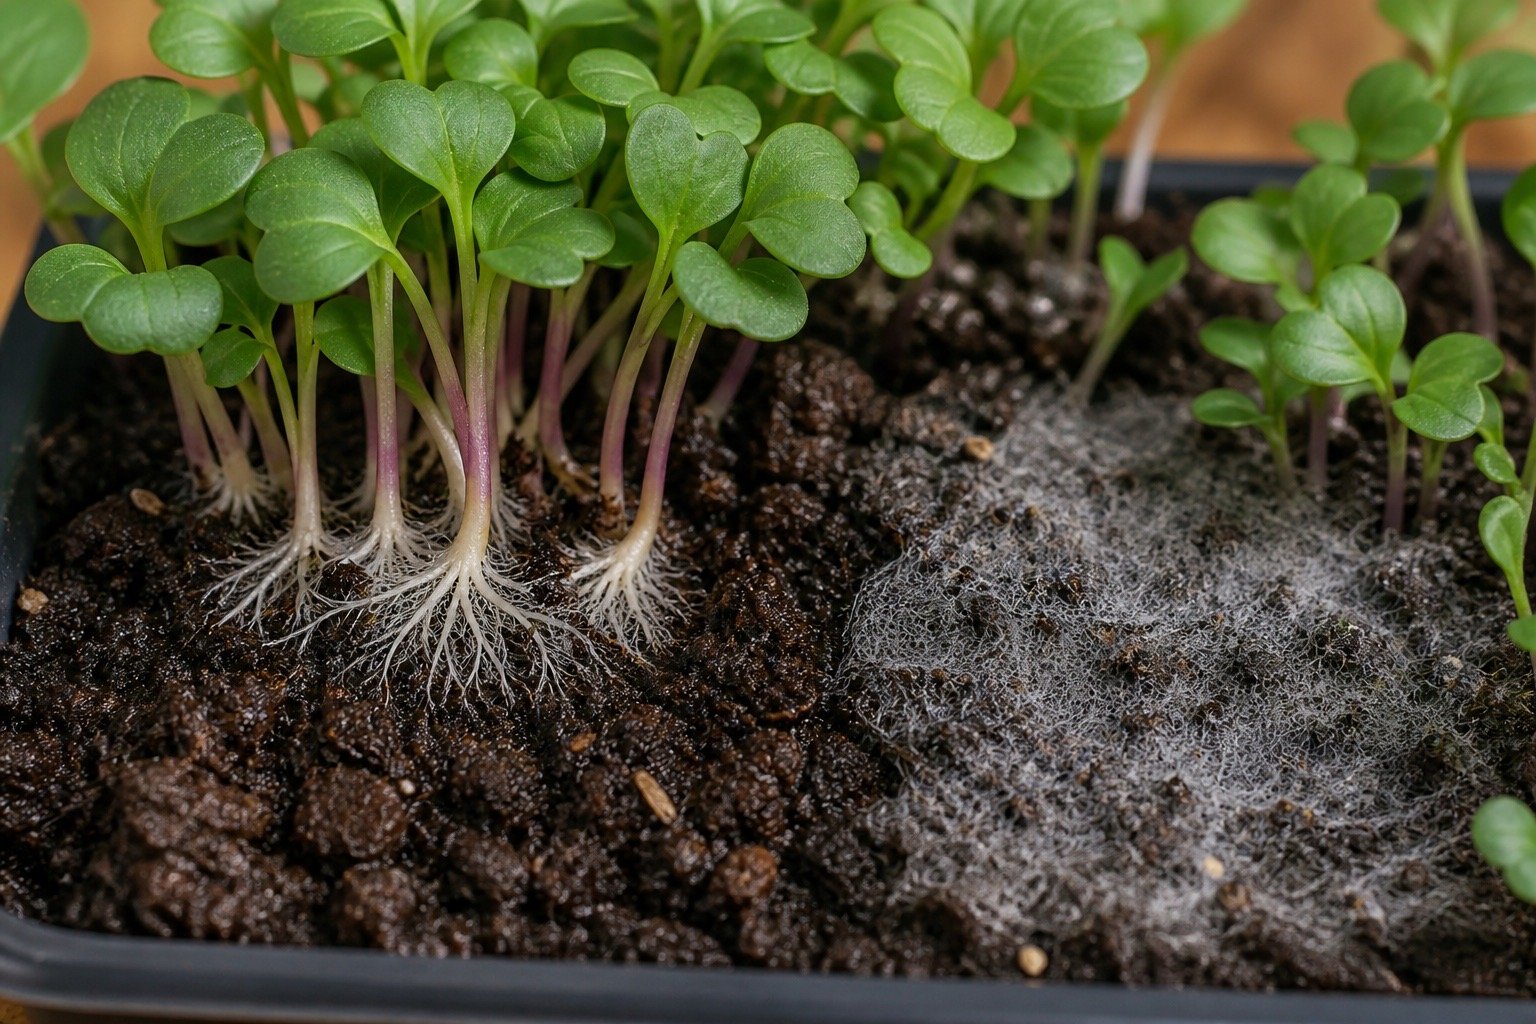
Microgreen mold vs root hairs can be hard to judge during the first days after germination. Fine white hairs around a radish root may be normal tissue that helps the seedling take up water. A spreading gray web across the medium or stems is a different signal. Color alone is not enough.
Use the five checks below together: location, pattern, response to moisture, smell and plant condition, then spread over time. If the evidence remains mixed, treat the tray as suspect food. Do not eat it, do not taste it to test it, and do not rely on a home spray to make questionable raw produce safe.
Microgreen mold vs root hairs: quick comparison
| Check | Normal root hairs are more likely | Mold or disease is more likely |
|---|---|---|
| Location | Attached to exposed roots near the medium | Across medium, seed hulls, or stems |
| Pattern | Similar halos around many individual roots | Irregular patches that bridge surfaces |
| Light mist | Fine hairs may flatten and look less fuzzy | Web-like patch remains or mats together |
| Smell and tissue | Fresh smell, firm stems, normal color | Sour or musty odor, slime, dark lesions, collapse |
| Change over time | Hairs move with the growing root zone | Patch expands into new areas or climbs stems |
No single row certifies that food is safe. LSU AgCenter advises discarding any crop that grows mold and restarting when in doubt. Purdue Extension likewise identifies root hairs as normal but stresses sanitation to avoid mold and pathogens.
What healthy root hairs look like
Root hairs are tiny extensions of root cells. On newly germinated microgreens, they often appear as a bright white halo just behind the smooth root tip. Radish makes them especially noticeable because the roots can rise above the surface before settling into the medium.
The pattern is orderly when you look closely. Each fuzzy area belongs to a root. Nearby seedlings at a similar stage show a similar halo, and the growth does not form a sheet that leaps across empty medium.
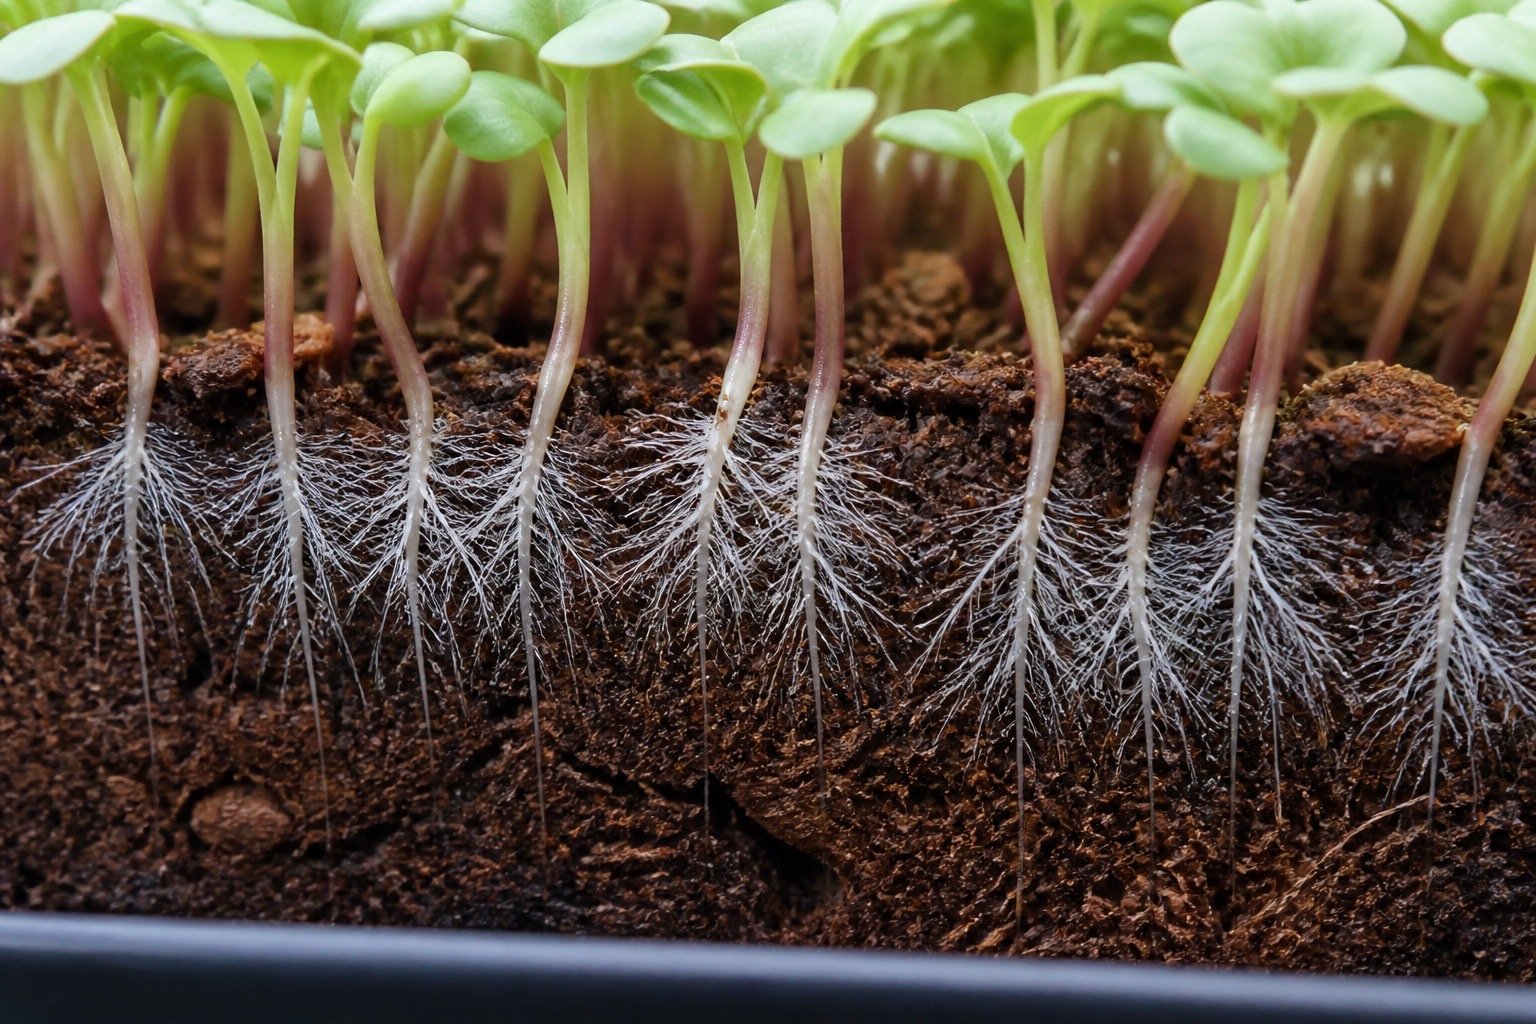
A small hand lens makes attachment points easier to see without pulling seedlings apart.
Search Amazon for a 10x hand lens for plant inspection (paid link)
What suspicious growth may look like
Possible mold or damping-off is less orderly. Growth may form a gray, white, or colored web across medium particles, ungerminated seed, hulls, and stems. LSU AgCenter notes that unusual growth migrating up microgreen stems is mold. Penn State shows damping-off in microgreen trays and explains that warm, humid conditions favor it.
Look beyond fuzz. Seedlings that become water-soaked, pinched, dark near the base, slimy, or collapsed have a plant-health problem even when you cannot name the organism. A sour, musty, or rotten odor makes a normal root-hair explanation much less plausible.
A few white strands are not permission to ignore the rest of the tray. Check the center and corners, where air movement and drying may differ. Inspect below seed hulls and wherever water collects.
Five checks before you decide
1. Trace the fuzz to its starting point
Use bright light and inspect without touching the crop. Root hairs should emerge directly from roots. They do not originate from a piece of coir, bridge two seed hulls, or run across the tray as a continuous web.
Do not pull seedlings for a closer look if you still hope to harvest the tray. Damaging tissue and handling edible plants adds another contamination route. A magnifying glass and a phone photo are safer ways to inspect the pattern.
2. Compare repeated halos with irregular patches
Normal root hairs repeat. Several roots at the same stage may each carry a narrow fuzzy band. Their location follows the roots even when the seedlings are scattered.
Mold tends to follow favorable moisture and organic material instead of plant anatomy. It may be heaviest in a wet corner, around a failed seed, beneath a lingering cover, or in the dense center. It can connect neighboring objects.
3. Use a light mist only as one clue
Extension materials from LSU and Oregon State describe a useful visual clue: root hairs tend to collapse or lose their fuzzy appearance when wet, while mold remains web-like. If you try it, use potable water and a very light mist on a small area.
This is not a food-safety test. Water can temporarily change the appearance of many fine structures. A patch that flattens has not been proven harmless, and a household grower cannot identify a fungus or pathogen by spray response alone.
Search Amazon for a fine-mist spray bottle for clean water (paid link)
4. Check odor, color, and stem condition
A healthy tray should smell fresh and earthy, not sour or musty. Stems should stand normally for their stage. Darkened bases, water-soaked tissue, slime, widespread yellowing, and collapse support a disease or decay concern.
Color can help but should not decide the case. Some fungal growth starts pale, and healthy root hairs are white. Green, blue, black, or pink growth is clearly not normal root hair, yet waiting for dramatic color is unnecessary when other warning signs already exist.
5. Isolate the tray and watch whether the patch spreads
Move a suspect tray away from healthy trays without carrying it over them. Take a photo, mark the time, and inspect again before the next watering. Root hairs track new root growth. Suspect growth may expand across stationary medium, failed seeds, or stems.
Observation is only for diagnosis and protecting nearby trays. It is not a reason to keep questionable greens for eating. If a patch spreads, plant tissue declines, or uncertainty remains, discard the entire edible crop.
What to do with a suspect tray
| Finding | Conservative action | Why |
|---|---|---|
| Fine hairs clearly attached to healthy roots only | Continue monitoring and correct excess moisture if present | The pattern is consistent with normal roots |
| Small unexplained web on medium or failed seed | Isolate and do not eat; discard if not confidently resolved | Home inspection cannot establish microbial safety |
| Growth on stems, odor, slime, or collapse | Discard the whole tray promptly | Signs support decay or disease |
| Any suspect crop for a vulnerable person | Discard rather than experiment | The consequence of a wrong call is higher |
| Uncertain after all five checks | Discard, clean, and restart | A new tray is safer than eating doubtful raw produce |
Do not cut around a suspicious patch and serve the rest. Visible growth does not show the full affected area. Do not rinse moldy greens and assume the problem is gone. Do not taste a seedling as a diagnostic step.
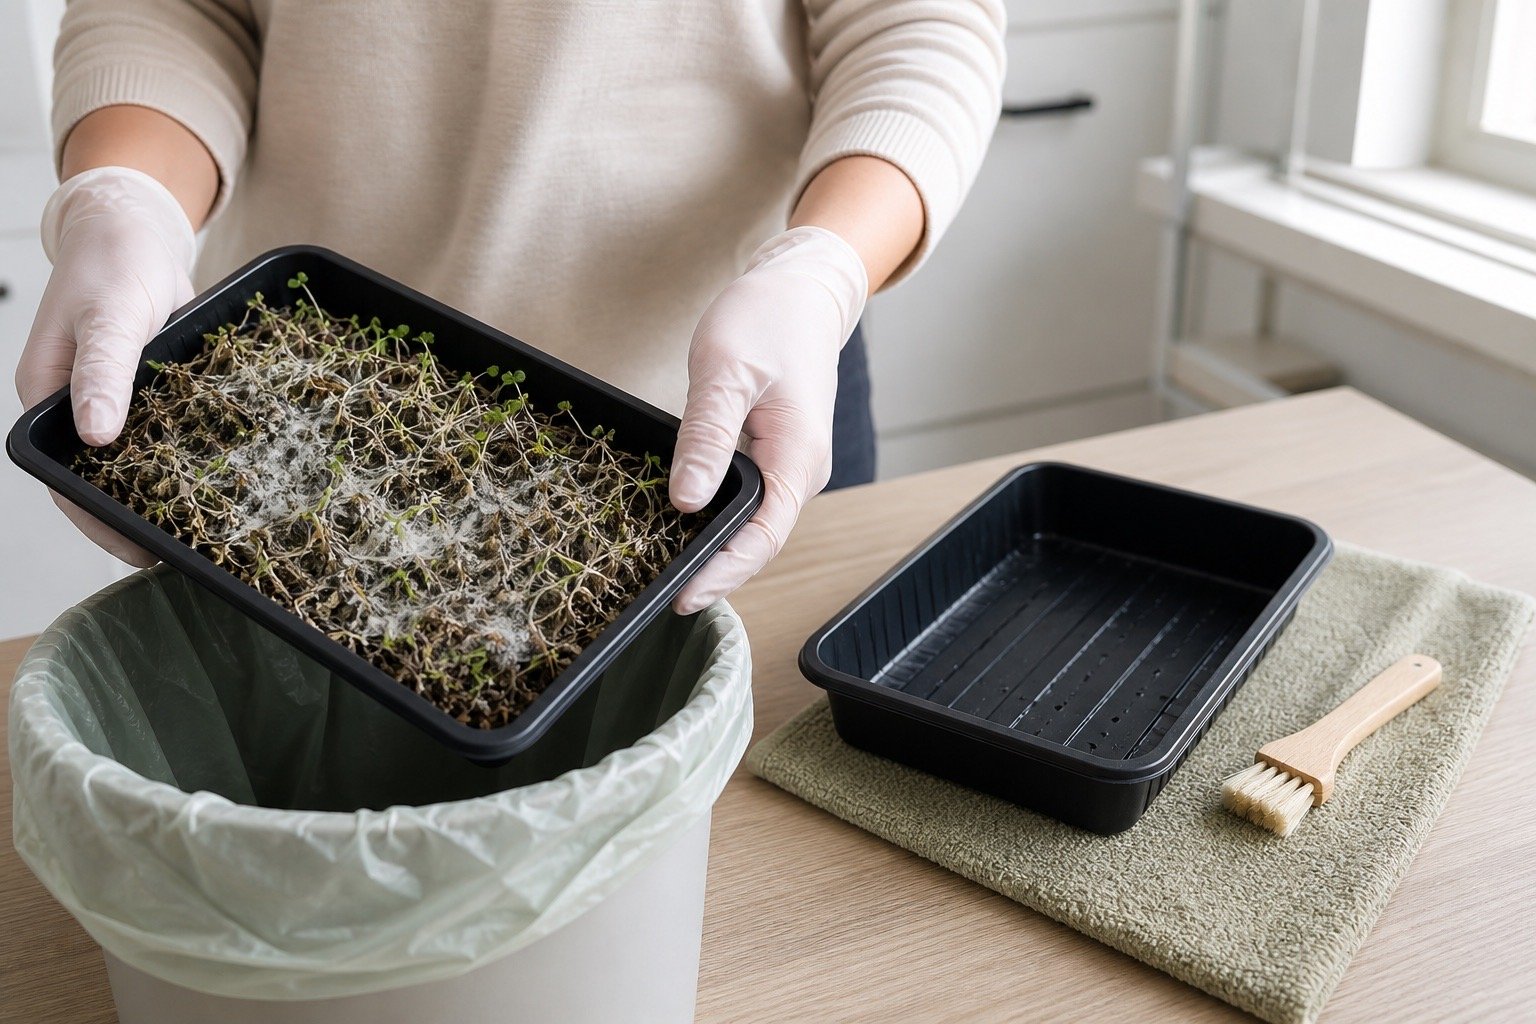
Bag the tray contents before moving them through the growing area. Wash your hands. Clean reusable trays and tools to remove plant debris, then sanitize them by a suitable food-contact method and follow the product label. A brush can help reach tray channels.
Search Amazon for a small tray-cleaning brush (paid link)
Why mold and damping-off appear
Microgreens grow close together in a moist environment, so small mistakes compound quickly. Penn State identifies warm, humid conditions as favorable to damping-off. Oregon State notes that overly wet, cold medium can lead seed and seedlings to rot or become moldy. These observations are not contradictory. Different organisms and crop stages respond to different conditions, while persistent moisture remains a common concern.
Typical contributors include a dirty tray, contaminated or poor-quality seed, dense sowing, stagnant air, a cover left on after germination, saturated medium, and failed seeds left in a wet canopy. One factor may be enough, but several often overlap.
Our radish, broccoli, sunflower, and pea shoot guides keep crop-specific sowing and germination details separate. Business growers should also apply a written sanitation and food-safety system alongside the broader planning in how to start a microgreens business.
How to reduce problems on the next crop
Begin with untreated seed intended for sprouts or microgreens and retain its lot information. Use clean trays, clean tools, potable water, and fresh medium. Wash hands before sowing and harvesting. Keep animals and dirty garden equipment away from the production space.
Measure seed rather than pouring until the surface disappears. Penn State recommends accounting for seed size, tray area, and germination. A dense tray can hold moisture in the canopy and make failed seeds harder to spot.
During germination, keep the medium damp without leaving the tray in standing water. Vent or remove covers at the right crop stage. University of Maryland Extension advises periodically venting covers so added humidity does not encourage mold. Once roots establish, bottom water and drain the excess so leaves and stems stay drier.
Give the crop useful light and gentle air exchange. A sealed still box is not a substitute for proper germination management. Do not point a strong fan at tender seedlings or blow air from a dirty floor across food crops.
Food-safety limits of home identification
A photograph can support a root-hair diagnosis, but it cannot prove the absence of harmful bacteria. Microgreens and sprouts are different products. FDA states that microgreens are harvested above the soil or substrate line and are not subject to the sprout-specific Subpart M rules, though covered commercial microgreens may fall under other Produce Safety Rule provisions.
For a home grower, the practical lesson is simpler. Clean growing reduces risk but does not turn sight and smell into laboratory testing. People who are pregnant, older, very young, or immunocompromised should seek current medical guidance about raw produce and avoid uncertain crops.
If anyone becomes ill after eating homegrown produce, contact a health-care professional. Preserve the relevant seed lot and growing notes if it is safe to do so, and follow local public-health reporting guidance.
Frequently asked questions
Do root hairs disappear when sprayed?
They often flatten and look less fuzzy after a light mist, as several Extension resources note. That response is a clue, not proof. Always consider attachment, pattern, odor, stem health, and spread as well.
Is white mold on microgreens safe to eat?
Do not eat a tray with suspected mold. Discard the crop, clean the equipment, and restart. Color alone cannot establish what organism is present or whether the rest of the tray is unaffected.
Can I remove one moldy spot and harvest the rest?
That is not a conservative food-safety choice. Visible growth does not define the full affected area. LSU AgCenter advises discarding crops that grow mold.
Does hydrogen peroxide make a moldy tray safe?
Do not use a home spray to rescue questionable food. A chemical may alter visible growth without proving the crop safe to eat, and unlabeled use can create another problem.
Why are radish roots so fuzzy?
Radish seedlings often produce conspicuous white root hairs near the medium. Look for repeated halos attached to individual roots. A web crossing medium, hulls, and stems deserves suspicion.
Sources
Sources checked August 12, 2026.
- Purdue Extension: Grow Microgreens at Home
- LSU AgCenter: Microgreens for the Home Gardener
- Oregon State University Extension: Microgreens
- Penn State Extension: Growing Microgreens
- Penn State Extension: A Step-By-Step Guide for Growing Microgreens at Home
- Penn State Extension: Ensuring Food Safety in Microgreens Production
- University of Maryland Extension: Growing Microgreens and Baby Greens Indoors
- FDA: Standards for Growing, Harvesting, Packing, and Holding Produce, guidance discussing microgreens