How to Grow Thyme Indoors: 7 Easy Steps
Last updated: August 13, 2026.
Affiliate disclosure: As an Amazon Associate I earn from qualifying purchases. Links marked "paid link" may earn Fern & Shelf a commission at no extra cost to you. Read our full Affiliate Disclosure.
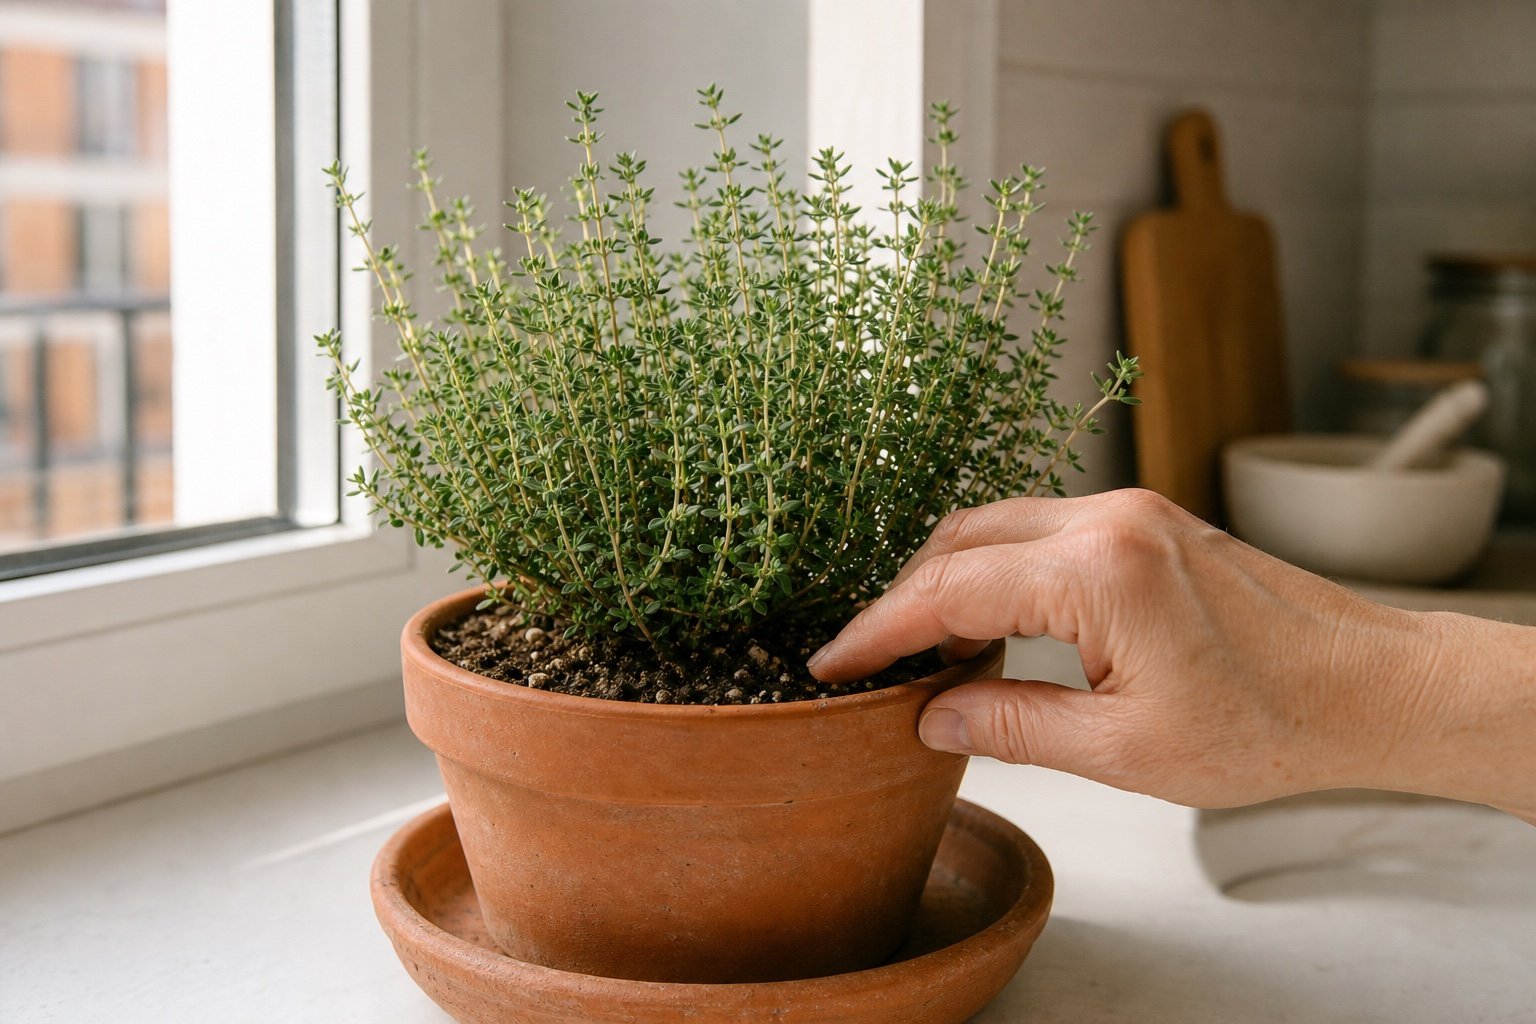
How to grow thyme indoors starts with strong light, a pot that drains promptly, and enough time for part of the root zone to dry before the next watering. This Mediterranean herb struggles in a dark corner or dense, constantly wet soil.
That makes thyme a good kitchen herb for someone who tends to water late, but a poor match for a person who tops up every pot each morning. The leaves are small, the stems become woody with age, and growth indoors can be modest. Give it the right setup, though, and you can snip fragrant tips without asking a supermarket bundle to survive in the refrigerator.
The quick indoor thyme setup
| Decision | Practical starting point | What to watch |
|---|---|---|
| Plant | Common thyme, Thymus vulgaris, sold for culinary use | Avoid assuming every ornamental thyme has the flavor or habit you want |
| Pot | A modest container with at least one open drainage hole | An oversized pot can hold wet mix around a small root ball |
| Mix | Fresh, loose container mix that drains freely | Dense garden soil stays wet and shortens the air supply to roots |
| Light | The brightest sunny window available, with a lamp if growth stretches | Wide gaps between leaves and pale stems usually mean the light is weak |
| Water | Check the mix and pot weight, then water fully when the root zone has partly dried | Do not water on a fixed calendar |
| Feeding | A light dose during active growth, following the product label | Soft, floppy growth can follow heavy feeding in weak light |
| Harvest | Cut flexible green tips above leafy growth | Leave the bare woody base and most of the plant intact |
These are starting points, not promises. A thyme plant beside cool winter glass dries differently from the same plant under a warm summer sun. Pot material, room airflow, root size, and the amount of foliage all change the routine.
Choose culinary thyme for a kitchen pot
Thyme is a broad group, and garden centers sell it for more than cooking. For a windowsill herb, look for common thyme, English thyme, or French thyme identified as Thymus vulgaris. Lemon thyme can also be useful in the kitchen, but it has a distinct citrus scent and does not taste identical to common thyme.
Low creeping thymes are often chosen as ground covers. They may be edible, but their growth habit is less convenient in a kitchen pot. A specific culinary label saves guesswork.
Illinois Extension notes that thyme can be started from seed, divisions, or stem cuttings, while divisions and cuttings are generally easier. Seed is worthwhile when you want a particular cultivar and do not mind a slower start. A healthy nursery plant is the simplest route to an established pot.
Before bringing any herb beside your other plants, inspect the stems, leaf joints, pot rim, and underside of the foliage. Use the new houseplant quarantine routine so a hidden pest is easier to contain.
Search Amazon for culinary common thyme seeds (paid link)
How to grow thyme indoors in seven easy steps
1. Start with one healthy plant or a small batch of seed
A compact transplant should have many short stems, small green leaves, and no sour smell rising from the pot. A few woody stems near the center are normal on an older thyme plant. Black, soft stems at the soil line are not.
If you start from seed, follow the depth and temperature directions on the packet. Use a shallow seed starting mix and keep it evenly moist during germination. That temporary moisture is for sprouting, not the permanent care routine. Once seedlings have several true leaves, thin them so air and light reach each survivor.
2. Choose a draining pot that fits the root ball
The container needs a real drainage opening, not a layer of pebbles under a sealed base. University of Maryland Extension recommends a well drained soilless mix for indoor herbs and identifies thyme as an herb that should dry between waterings.
A small thyme transplant usually settles comfortably into a pot only one size wider than its nursery container. Terracotta loses moisture through its porous wall, so it may need checks sooner than glazed ceramic or plastic.
Use fresh container mix rather than soil dug from outdoors. The mix should accept water without collapsing into mud. If water pools for a long time, runs down a gap at the edge, or leaves the pot heavy for days, work through the potting soil drainage checks before watering again.
Set the crown at the same level it grew in the nursery pot. Burying the woody center can keep vulnerable stem tissue damp. Place a saucer below the pot, then empty it after the runoff has finished.
Search Amazon for a small terracotta pot with drainage (paid link)
3. Give thyme the strongest light you can provide
Light is usually the limiting factor when people learn how to grow thyme indoors. Penn State Extension places thyme among herbs that need strong direct light indoors. A sunny south or west window is the sensible natural starting point in much of the United States.
Judge the plant, not the compass alone. Nearby buildings, trees, screens, tinted glass, and winter sun angle can turn a nominally sunny window into a dim one. Compact growth with short gaps between leaves is encouraging. Long pale stems that lean hard toward the glass are asking for more usable light.
Rotate the pot when one side does all the reaching. If the plant continues to stretch, add a white or balanced grow light. Our guides to grow light duration and fixture distance cover the two adjustments separately. Start with the fixture directions, then watch for bleaching or heat.
Search Amazon for a small grow light with a timer (paid link)
4. Check moisture instead of following a watering day
Thyme dislikes staying saturated, but that does not mean it should be abandoned until the entire root ball turns to dust. Push a finger into the mix, lift the pot, and compare both readings with the last time you watered. When the upper root zone feels dry and the pot is noticeably lighter, water slowly enough to moisten the full root ball. Let the excess escape and empty the saucer.
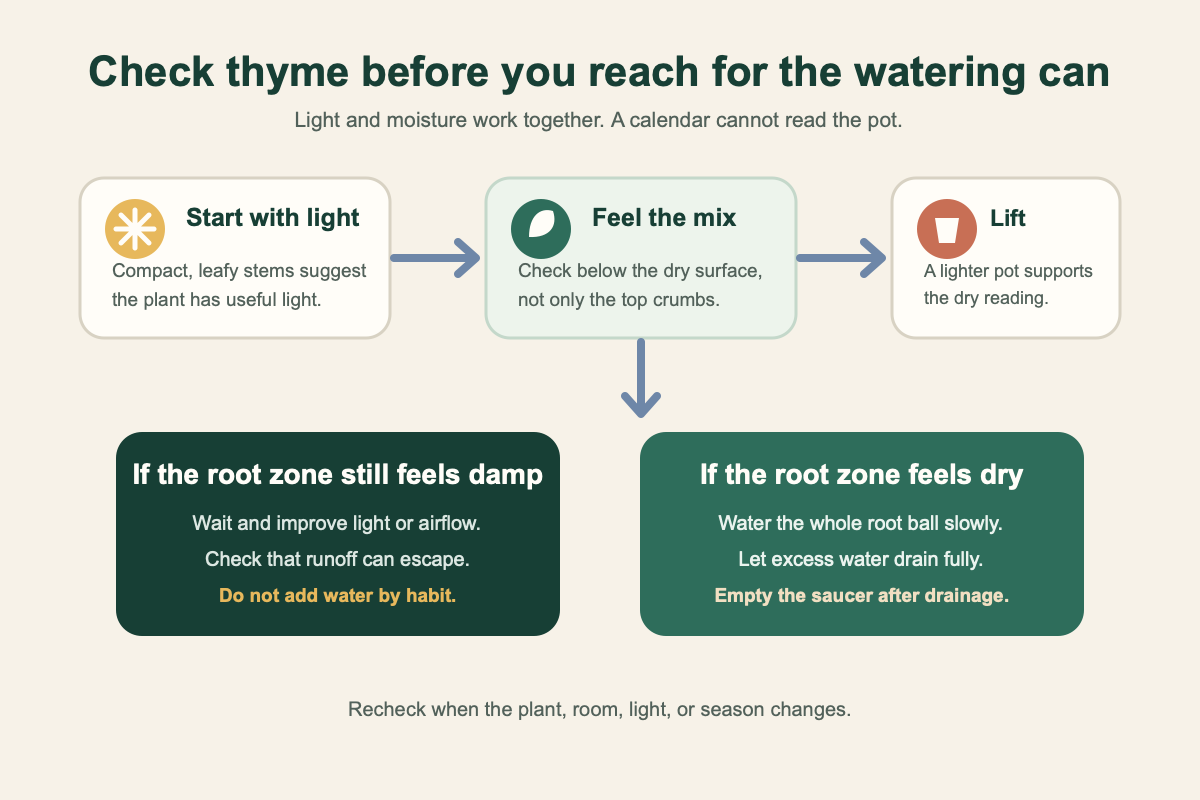
If the mix below the surface still feels cool and damp, wait. Check whether the plant has adequate light, whether the drainage hole is clear, and whether the pot is much larger than the roots. A date on your phone can remind you to inspect the pot. It should not order you to pour.
Penn State Extension advises allowing thyme to dry slightly between waterings. That phrase is more useful than a weekly number because it responds to the actual pot. The broader indoor plant watering guide explains why a plant can need different intervals across the year.
5. Feed for steady growth, not maximum speed
Container thyme still needs nutrients, but it is easy to overfeed a small pot. Penn State Extension warns that fertilizing indoor herbs more often than instructed can affect their aroma and taste. Illinois Extension's container herb guidance also recommends avoiding excessive fertilizer and notes that many herbs do not need much. Extra fertilizer cannot compensate for weak light.
Start with the nutrients already present in fresh potting mix. When the plant is actively making compact new leaves, use a complete fertilizer at a light rate allowed on the product label. Do not add more because a dim plant looks pale or stretched. Fix the light first.
6. Pinch and harvest flexible green tips
Begin with small cuts once the plant has enough foliage to spare. Choose a flexible stem with green leaves and cut just above leafy growth. Leave the woody base and most of the canopy untouched. Pinching several tips encourages branching and usually gives the pot a fuller shape.
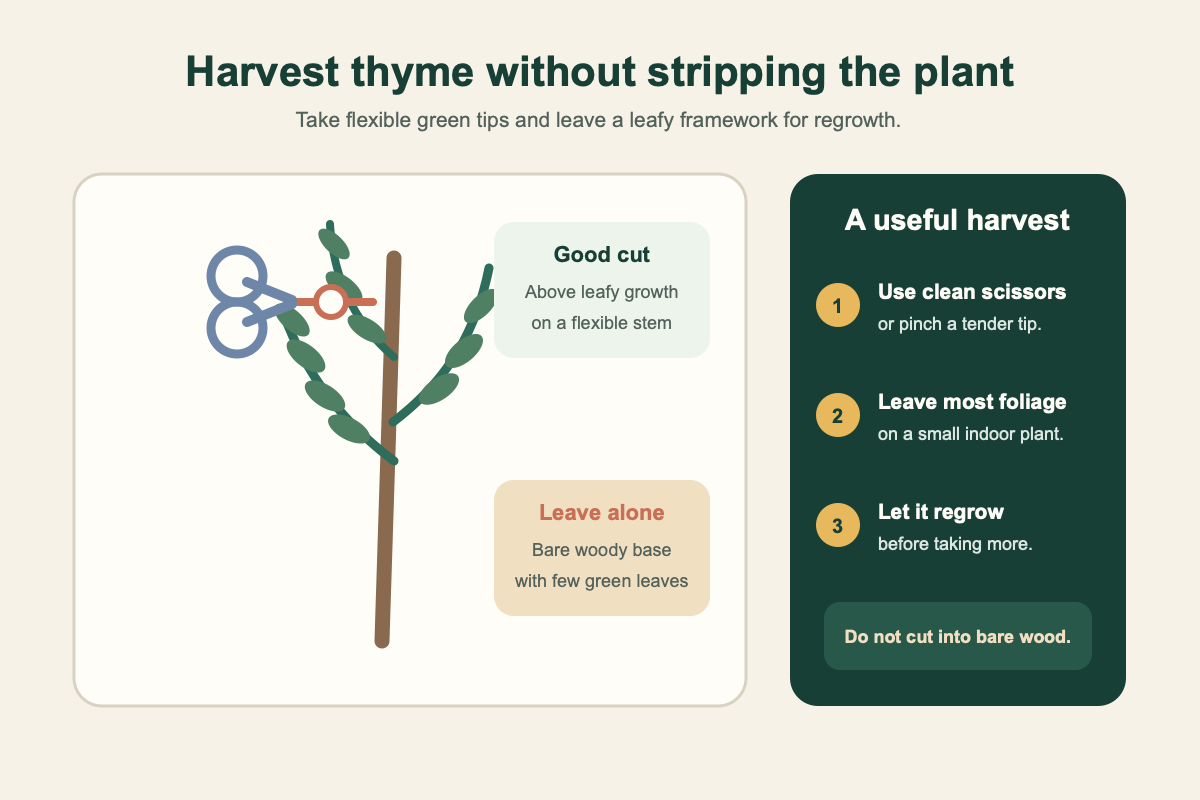
Do not shear a small plant down to bare sticks for one recipe. Old woody sections may not replace foliage readily after a severe cut. Take a modest amount, use it, and let the plant rebuild before another harvest.
Illinois Extension recommends harvesting stems before flowering for the best flavor. Indoors, regular tip harvests can delay flowering, but a mature plant may still form buds. Remove the flower tips if leaves are your priority.
Rinse harvested sprigs under running water before cooking.
7. Refresh an old, woody plant before it declines
Thyme becomes woody with age. That is normal, not proof that you failed. The useful question is whether the plant still carries plenty of green growth and replaces what you harvest.
When the center turns sparse, take healthy tip cuttings or divide the plant if it has several rooted sections. Starting a replacement while the old pot still tastes good is less frustrating than waiting until only brittle stems remain. Illinois Extension notes that cuttings and divisions are practical ways to propagate thyme.
What an unhappy thyme plant is telling you
Knowing how to grow thyme indoors is mostly a matter of reading a few plain signals. One symptom rarely names the cause by itself, so look at the mix, roots, light, and recent changes together.
| Symptom | Likely possibilities | Best next check |
|---|---|---|
| Long, pale, widely spaced stems | Insufficient usable light | Move to a brighter position or adjust the lamp |
| Yellow leaves while the pot stays heavy | Wet mix, blocked drainage, oversized pot, or weak light | Check below the surface and make sure runoff can leave |
| Crisp tips with a very light pot | The root ball dried too far | Water the mix fully, then review how fast the pot dries |
| Dry surface but wet lower mix | Normal layering or a dense lower root zone | Use a finger, skewer, or pot weight before adding water |
| Sparse woody center | Natural aging, shade, or repeated cuts into bare stems | Root a healthy tip and change the harvest pattern |
| Fine stippling, webbing, or moving specks | A possible pest, not a watering diagnosis | Isolate the pot and identify the insect before treating |
| White crust on the rim or mix | Mineral or fertilizer salt buildup | Review fertilizer rate and water quality, then flush if the plant and pot can drain freely |
Root trouble often begins with the combination of wet mix and weak light. Repotting into a much larger container does not automatically help. If roots are soft or the mix smells sour, remove damaged material, use a clean draining pot, and correct the conditions that kept it wet.
Can thyme share a windowsill with other herbs?
Yes, but separate pots make care easier because basil, parsley, and thyme do not share one moisture rhythm. See the individual guides for growing rosemary indoors, growing basil indoors, and growing parsley indoors when planning a mixed kitchen shelf.
If the window is not bright enough for several Mediterranean herbs, a lamp may be simpler than rotating every pot through one narrow patch of sun. The guide to growing herbs indoors without sunlight covers the broader setup.
Frequently asked questions
Can thyme grow indoors all year?
It can remain indoors through the year if it receives strong light, good drainage, and sensible watering. Growth may slow in winter, and an aging plant will become woodier. Do not promise one pot a permanent lifespan. Keep a cutting or young replacement in mind.
How much sun does indoor thyme need?
Give it the strongest sunny window available. Penn State Extension recommends at least six hours of sunlight for sun-loving indoor herbs. Treat that as a starting target because glass, season, and exposure change the intensity. Compact growth is a better verdict than a clock alone. Add a grow light if the stems stretch.
How often should I water thyme indoors?
There is no reliable number of days. Feel below the surface and lift the pot. Water when part of the root zone has dried and the pot feels lighter, then drain the excess. Check sooner in warm bright conditions and later when growth is slow.
What is the easiest way to learn how to grow thyme indoors from seed?
Follow the seed packet for sowing depth and temperature, keep the starting mix evenly moist, and provide strong light as soon as seedlings emerge. Thin crowded seedlings. Once roots are established, shift from constant seed tray moisture to the drier rhythm preferred by mature thyme.
Why is my indoor thyme turning brown?
Brown growth can follow prolonged wetness, severe drying, weak light, salt buildup, cold or hot air, an old woody center, or pests. Check whether the damaged tissue is soft or crisp, inspect the root zone, and review what changed before choosing a fix.
Can I cook with thyme grown under a grow light?
Yes, if it is a culinary thyme and you have used inputs labeled appropriately for edible plants. Keep sprays and household contaminants away from the foliage, follow every product label, and wash harvested stems before use.
A bright window and a light hand go a long way
The practical answer to how to grow thyme indoors is not a complicated schedule. Start with culinary Thymus vulgaris, give it a draining pot and serious light, and let the root zone partly dry before watering again. Feed modestly. Harvest green tips rather than cutting into a bare woody base.
The plant will still change with the season and age. That is useful information, not a reason to chase it with more water. Watch the spacing between leaves, the weight of the pot, and the quality of new growth. Those clues will tell you more than any recurring calendar alert.
Sources and further reading
Sources were checked July 26, 2026.
- Illinois Extension: Thyme
- Penn State Extension: Growing Herbs Indoors
- University of Maryland Extension: Growing Herbs in Containers and Indoors
- Illinois Extension: Growing Herbs in Containers
- University of Maryland Extension: Growing Vegetables in Containers and Salad Tables
- Illinois Extension: Thyme in the Landscape